![]()
Jira is a development project management software created by Atlassian. The guide below is a tutorial for installing Jira Server on a Zone virtual server. It is a proof of concept to demonstrate the technical capability of the Zone web hosting platform to serve Java applications.
1. Create a subdomain for Jira
The easiest way to install Jira on a subdomain is to display its web interface to the user from the Jira Java server through a web server proxy. For example, you could create a subdomain called jira.mydomain.com
When adding the subdomain, set the mod_proxy destination port to 8080.
2. Create a MariaDB database and user.
NOTE! Make sure that when you create the database, its ‘Collation’ is utf8_bin!
Create the MariaDB database and user for Jira in the My Zone control panel and give the newly created user all rights to the Jira database. Remember the MariaDB password or save it in your password manager.
3. Log in to the virtual server using SSH.
Instructions for establishing an SSH connection.
4. Install Java
From the address https://java.com/en/download/manual.jsp, right click on Linux x64 and “Copy link address”, use this address to download the Java package using wget.
(PS! This is an example and installs the old version!).
cd ~/.zse/opt/oracle/java/
wget -O java.tar.gz https://javadl.oracle.com/webapps/download/AutoDL?BundleId=240718_5b13a193868b4bf28bcb45c792fce896
tar -zxf java.tar.gz
ln -sf jre1.8.0_231/bin bin
ln -sf jre1.8.0_231/lib lib
rm -f java.tar.gz
5. Install Jira
Jira can be downloaded from https://www.atlassian.com/software/jira/download. Select TAR.GZ Archive from the drop-down menu, tick the checkbox, right-click Submit and copy the URL (“Copy link address”). Download Jira using wget.
Run it manually:
mkdir -p ~/atlassian/application-data/jira
cd ~/atlassian/
wget https://www.atlassian.com/software/jira/downloads/binary/atlassian-jira-software-8.6.1.tar.gz
tar -xzf atlassian-jira-software-8.6.1.tar.gz
ln -sf atlassian-jira-software-8.6.1-standalone ~/atlassian/jira
rm -f atlassian-jira-software-8.6.1.tar.gz
6. Install MySQL connector
Since the latest MySQL Connector does not work properly, download version 5.1.44 of the MySQL Connector.
Run it manually:
cd ~/atlassian/
wget https://dev.mysql.com/get/Downloads/Connector-J/mysql-connector-java-5.1.44.tar.gz
tar -xzf mysql-connector-java-5.1.44.tar.gz
ln -sf ../../mysql-connector-java-5.1.44/mysql-connector-java-5.1.44-bin.jar ~/atlassian/jira/lib/
rm -f mysql-connector-java-5.1.44.tar.gz
7. Make the necessary configuration file changes
sed -i 's|#JIRA_HOME=""|JIRA_HOME="${HOME}/atlassian/application-data/jira"|' ~/atlassian/jira/bin/setenv.sh
sed -i "s|<Server port=\"8005\".*shutdown|<Server port=\"8005\" address=\"$(vs-loopback-ip -4)\" shutdown|" ~/atlassian/jira/conf/server. xml
sed -i "s|<Connector port=\"8080\".*relaxedPathChars|<Connector port=\"8080\" address=\"$(vs-loopback-ip -4)\" relaxedPathChars|" ~/atlassian/jira/conf/server.xml
sed -i "s|localhost|$(vs-loopback-ip -4)|g" ~/atlassian/jira/conf/server.xml
.
sed -i 's|<Connector port="8080".*address|<Connector port="8080" ProxyName="jira.sinudomeen.ee" ProxyPort="443" scheme="https" address|' ~/atlassian/jira/conf/server.xml
8. Add PM2 work
PM2 is used to make the application run automatically after the server has been initialized.
Create a file called ~/atlassian/jira.config.js and put it there:
module.exports = {
    apps : [{
        name : "jira",
        script : process.env.HOME + "/atlassian/jira/bin/start-jira.sh",
        args: "-fg",
        max_memory_restart : "3G"
    }]
}
Go to My Zone control panel under Web Server -> PM2 and Node.js and select Add New Application.
Put the name of the application in Jira.
In the script or PM2 .JSON field enter: atlassian/jira.config.js
Maximum memory usage: 1MiB
Click Add.
Trace the Jira log file on the server:
tail -f ~/atlassian/application-data/jira/log/atlassian-jira.log
When the log file starts running, the created subdomain should display an image and further configuration is done via the web.
9. Configuring the database
Open https://jira.mydomain.com in your browser and select I’ll set it up myself -> Next.
Database Connection -> My Own Database.
Database Type -> MariaDB 10.6.
Fill in the remaining fields with the MariaDB database data you created earlier.
The hostname can be found in the My Zone MariaDB configuration page.
The port is 3306.
Select Test Connection and Next.
Setting up the database will now take a few minutes.
After the configuration you can change the Base URL to https and delete the port: https://jira.mydomain.com/
10. Generate a licence
The next step is to request a license. Select “generate a Jira trial license” right click and “Open link in new tab”.
Log in as Atlassian user. If there is no user, create a user.
Select Jira Software (Server) license and Generate License. When asked if you want to install the license immediately on the server, select Yes.
If for some reason the automatic license installation does not work, you will need to manually copy the license and paste the generated license into the license window in the second tab.
11. Configuring Jira
Create an administrator user.
Log in to the Jira administration with the administrator user.
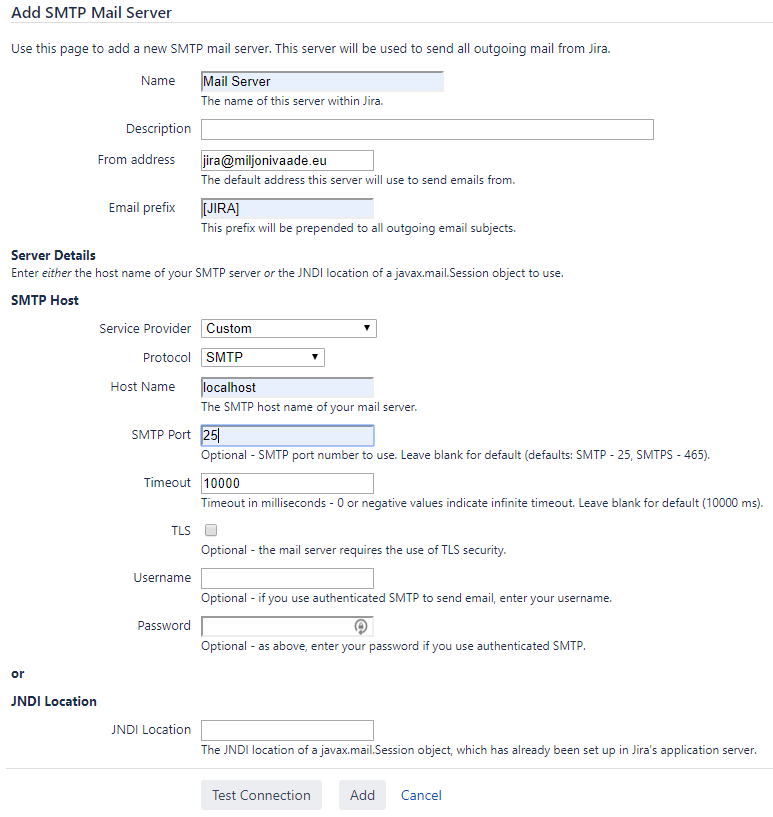
Configure Outgoing mail. Add a new SMTP mail server with Host as localhost and port 25. SMTP username and password are not required.
Enjoy your use of Jira!
More information and debugging
You can manually start and stop JIRA without PM2 using the following commands (make sure that PM2 has not started the server first):
~/atlassian/jira/bin/start-jira.sh
~/atlassian/jira/bin/stop-jira.sh
If PM2 is configured, then start and stop should be done through PM2.
Commands: pm2 list to display and pm2 restart jira to restart the Jira server.
If the Java server does not start for some reason, it is worth looking at the following log files:
cat ~/.pm2/logs/jira-out.log
cat ~/atlassian/jira/logs/catalina.out
Error message: MariaDB 10.6 is not supported. This warning can be ignored.
.
Upgrading Jira
The upgrade procedure is relatively simple. Since we made a link when installing, all you need to do to upgrade is change the link to the new version and copy the config file:
- Download the new version of Jira and unzip it.
- Stop Jira server
- Change link to new version
- Overwrite
conf/server.xml - Start Jira server
cd ~/atlassian/
wget https://www.atlassian.com/software/jira/downloads/binary/atlassian-jira-software-8.6.1.tar.gz
tar -xzf atlassian-jira-software-8.6.1.tar.gz
pm2 stop jira
ln -nfs atlassian-jira-software-8.6.1-standalone jira
ln -sf . ./../mysql-connector-java-5.1.44/mysql-connector-java-5.1.44-bin.jar ~/atlassian/jira/lib/
cp atlassian-jira-software-8.6.0-standalone/conf/server.xml atlassian-jira-software-8.6.1-standalone/conf/server.xml pm2 start jira