Zone’s customer support and technicians can assist you with migrating your website and email to the Zone web-hosting as a paid service.
For more time-consuming tasks, there will be a charge for the service. You can find the technician’s hourly rate here, with billing occurring in half-hour increments.
To receive a precise offer, contact our customer support at info@zone.ee.
If you prefer to migrate the services yourself, the entire process can be divided into five separate steps. To avoid making the process overly complicated, we recommend completing each step one at a time and moving on to the next only after completing the previous one. This ensures the safest way to avoid data loss and unplanned service interruptions.
Summary
Here’s a very brief summary of the entire process. Each step is detailed at the end of the article.
During a proper migration of services, there is no data loss on the website or in email accounts, and the domain redirection interruption occurs at a time that suits you best.
There will be a 1-2 hour interruption during the nameserver change.
The Five Steps of Migration
Choosing and Ordering a webhosting package
The first step is to select a suitable web-hosting package for hosting your website and email. You can review the available packages here.
You can always upgrade your package in the future, so initially, you can choose based on the description of packages.
- Starter package – You have a simple informational website and a few email accounts. Also suitable for small e-commerce sites. Perfect for hosting simpler websites built on WordPress or Joomla!
- Business package – You have a larger e-commerce site with regular simultaneous visits.
- Pro package – For highly visited online stores like Magento or WordPress Woocommerce, and you also need plenty of email account storage.
- For very resource-demanding and business-critical services, we offer Managed Dedicated Servers
- If you need assistance in choosing a package, please contact our customer support and describe exactly what package you might need.
Once you have selected the appropriate package, click on “Order”. On the next page choose “I already have a domain, I only need web hosting”.
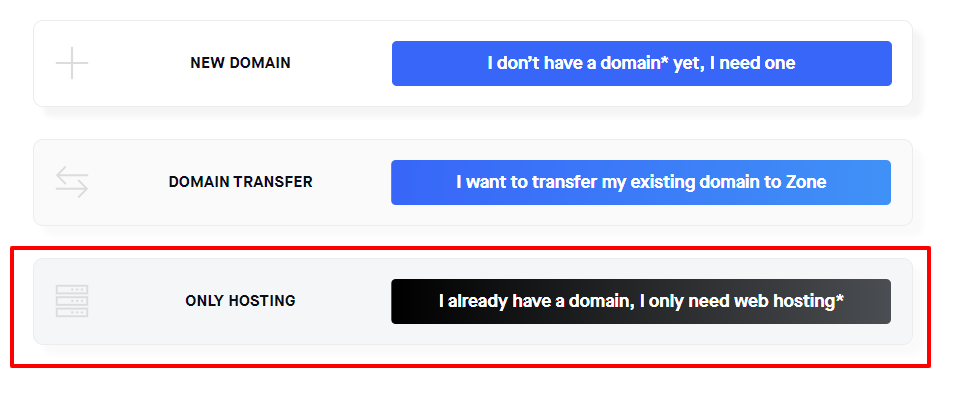
With this option, we ensure the current website continues to function as usual.
Generally, we open the web-hosting service automatically within 30-60 minutes. If we have any questions while completing the order, we will contact you!
Upon successful completion of the order, an automatic notification will be sent to the contact email address associated with your Zone user account.
Website migration and setup
After opening the webhosting service, the next step is to transfer the website files and database, and then configure the entire website to work on the Zone server.
Once the web-hosting service has been opened, the next step is to migrate the website files and database, and then set up the entire website on Zone web-hostingr.
If you have cron jobs, Redis, or any other similar application running with another service provider, these also need to be configured within the Zone web-hosting management.
There are two options for website migration.
We will handle the website migration for you
If you have a simple informational website created in WordPress, Joomla!, or any other widely used content management software (CMS), simply send us a message with your website address and access credentials to your current service provider’s FTP server, and if possible, also provide access to the CMS admin panel.
Our customer support can handle the migration of most simple and modern websites in less than half an hour, so transferring your entire website is free of charge for you! Moreover, the result is fast and efficient because we are very familiar with our system and can anticipate various migration details in advance.
Additionally, we can integrate almost all popular content management software with the Zone+ application manager, which takes care of automatic updates and helps you better manage the application in the future.
You can migrate the website yourself or with the help of a web developer
Website migration requires basic knowledge of website functionality, FTP, and databases. Here are the migration steps briefly outlined assuming the website uses a MySQL/MariaDB database:
- Download the files from your current service provider’s server and transfer them to the Zone. Data can be uploaded in two ways:
- Using an FTP account, which you can create through server management from the “FTP” -> “User Accounts” menu.
- Using SSH access, which you can create access to via key pair from the “SSH” menu.
- Export the database from your current service provider as an .SQL file.
- Add a database user and database to the Zone web-hosting. You can do this from the “Databases” -> “MySQL/MariaDB” menu.
- Upload the previously exported database file to the created MySQL/MariaDB database. This can also be done in two ways:
- Using phpMyAdmin at the address https://pma.zone.ee/. You can log in there with the previously created database user.
- Through SSH access.
- Connect the database to the web server using the website’s configuration file. You can find the hostname of your database server in the server management menu under “System information”. The database hostname is in the format dxxxxx.mysql.zonevs.eu.
- Check that the correct root directory path is used in both the database and files. You can find your server file’s path in the web-hosting management menu under “System information”. The directory path is typically in the format: /dataxx/virtxxxxx/domains/www.yourdomain.com/htdocs
Migrating email accounts and their content
First, you need to create all the email accounts on our web-hosting that you use with your old service provider and plan to migrate. Creating email accounts is possible from the web-hosting menu under “E-mail” -> “Mailboxes”. When creating accounts, you must specify the account name, size limit, and password.
After creating the accounts, there is a physical account where e-mails and folders can be transferred. To test the account’s functionality, you can already log in at https://webmail.ee/.
There are two options for moving mailbox content.
We will move the mailbox content for you
Our customer support can use a tool to automatically migrate mailbox contents without anyone seeing the content. To move emails to the Zone web-hosting, we require the names of the email accounts, passwords, and the incoming mail server address used with the old service provider.
Zone employees do not have access to mailbox content during the migration.
Moving the content of 5-10 mailboxes to the Zone web-hosting is usually free of charge. For a more precise offer, customer support can provide it once the sizes and number of accounts are known.
Move the mailbox content yourself
Users can also handle the migration of their email accounts themselves. The simplest way to do this is by using the IMAP protocol and an email client program (such as Outlook, Thunderbird, etc.). The prerequisite is that the email account with the old service provider is already set up in the same application. Here are the detailed steps:
- Add the new email account created in Zone to your email application using IMAP.
- Drag and drop emails from the folders of the old service provider’s account to the new account, one by one.
- It is recommended to ensure you have a backup copy of your emails before migrating! If emails are lost during the migration process, we cannot recover them from anywhere.
Domain transfer(optional)
Domain transfer to Zone is optional because it is not directly necessary for using the website and/or email on Zone web-hosting.
However, keeping the domain and server under the same service provider significantly simplifies the management of services in the future.
To transfer the domain, you need to request the EPP authorization code from your current service provider, and for some domain extensions, you may also need to unlock the domain name (this is necessary, for example, with generic domains like .COM, .NET, .ORG, etc.).
Once you have obtained the authorization code, you can start the migration process from here.
Domain redirection to the webhost
Once you have transferred the data from the old service provider to Zone and ensured that the new website is working correctly on our webhosting, you need to proceed with domain redirection.
Everything is hosted with Zone
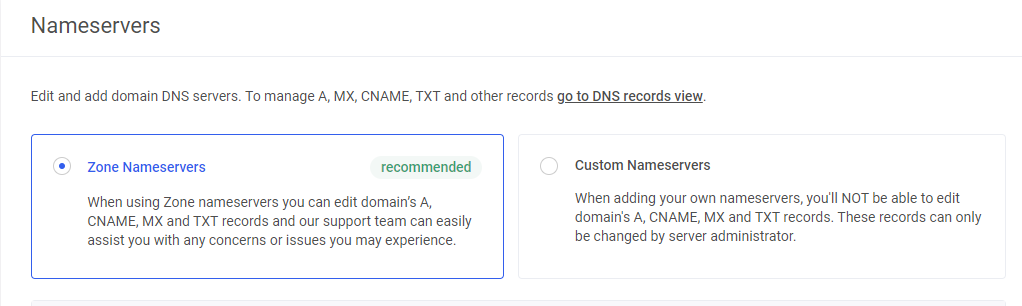
If your website, email, and domain name are all moved to Zone, then to redirect the domain, you need to change the nameserver records from the domain management.
For this select “Domains”, then choose the domain name and then choose “DNS Servers”.
n the following window, click on the option “Zone Nameservers” and then “Confirm Zone Nameservers”
The domain is hosted elsewhere. The website, email, and nameservers are with Zone
If you have a domain name whose registration service is not provided by Zone or for any other reason you do not wish to transfer the domain, you can direct the domain’s nameservers directly to Zone.
To do this, redirect or have your domain registrar replace the nameservers with those of Zone, which are as follows:
ns.zone.eu (217.146.66.65)
ns2.zone.ee (85.234.242.32)
ns3.zonedata.net (90.191.225.242)
The website and/or email are hosted with Zone. The nameservers and/or domain are hosted elsewhere
If you are using nameservers from another service provider, you can redirect all services separately to Zone using DNS records.
Redirecting website
To redirect the website, you need to change the domain’s A record at the nameserver manager to the IP address of the Zone web-hosting. You can find the correct IP address in the webhosting management menu under “System information”.
Redirecting e-mail
To redirect e-mail to the Zone webhosting, you need to assign the following MX record to the domain in your nameserver manager:
zonemx.eu priority 10