SFTP, abbreviation of SSH File Transfer Protocol (also know as Secure File Transfer Protocol), is a network protocol for securely accessing and transferring files from the server.
SFTP is an extension of SSH and authentication is done using a public-private key pair.
SSH Key Pair
First you need to create an SSH key pair and add its public key to your web server.
Instructions for this can be found in the following help article:
Establishing an SSH connection
Establishing a Connection
This help article provides instructions for establishing an SFTP connection using programs FileZilla, WinSCP and Visual Studio Code.
For additional questions or if you are using a different program, refer to the program’s documentation and support materials (usually found under the Help menu in the program).
FileZilla
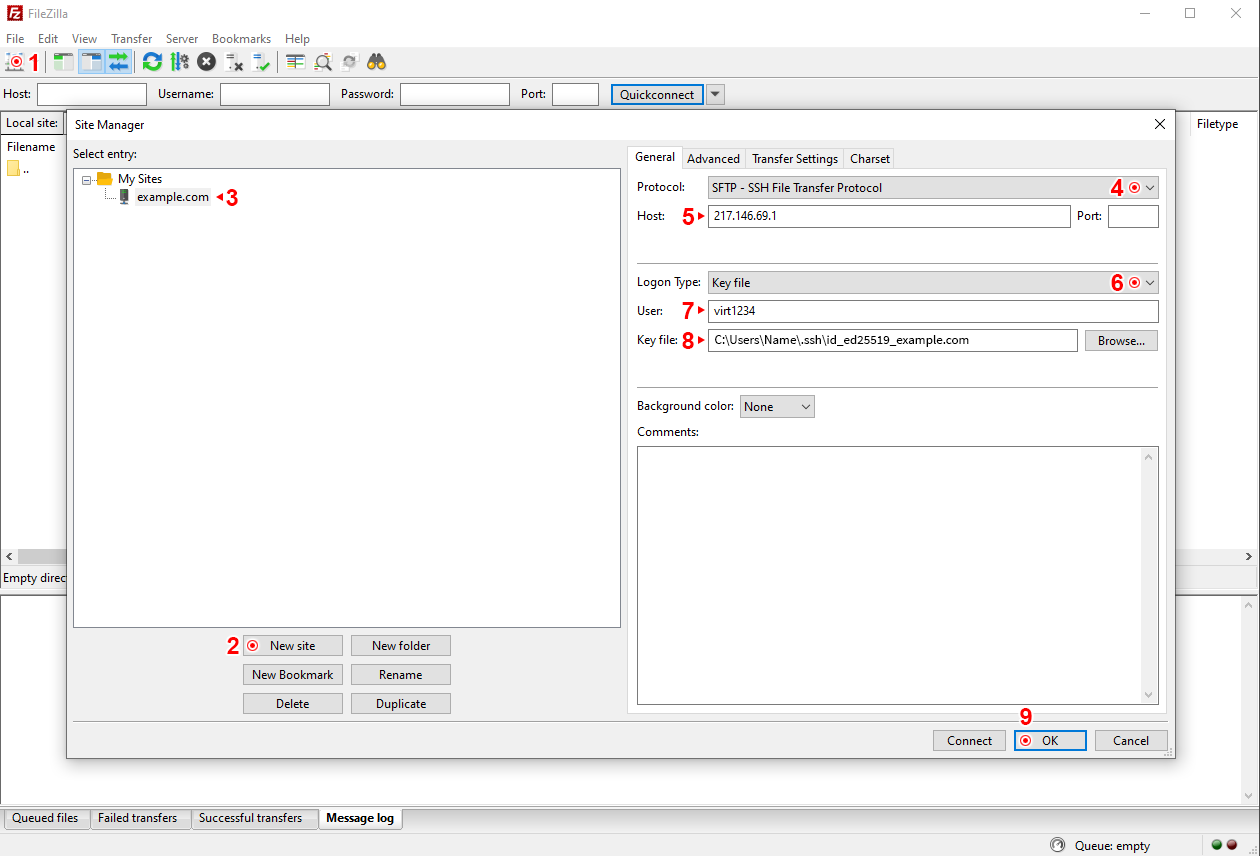
Open Site Manager (1).
Add a new connection by clicking on the New site button in the Site Manager dialog Site Manager dialog (2) and giving it a name (e.g., domain name) (3).
From the Protocol dropdown menu, select SFTP (4). You can leave the Port field empty since the default port 22 is used.
In the Host field, enter the IP address of the hosting server or the domain name of the web server hosted on that server (5). It is recommended to use the IP address to avoid any potential DNS issues with the domain.
For Logon Type, select Key file from the dropdown menu (6). Supported private key formats include PEM and PuTTY’s PPK. If Pageant is used for loading the private key, select Interactive, in which case you don’t need to specify the location of the private key on the computer.
Enter the system username into User textbox (7).
For Key file, select the private key file from your computer, which corresponding public key has been added to the web server through My Zone (8).
Save the SFTP connection configuration by clicking on the OK button (9).
Now the SFTP connection for the web server is configured and can be used to log in by clicking on the Connect button.
WinSCP
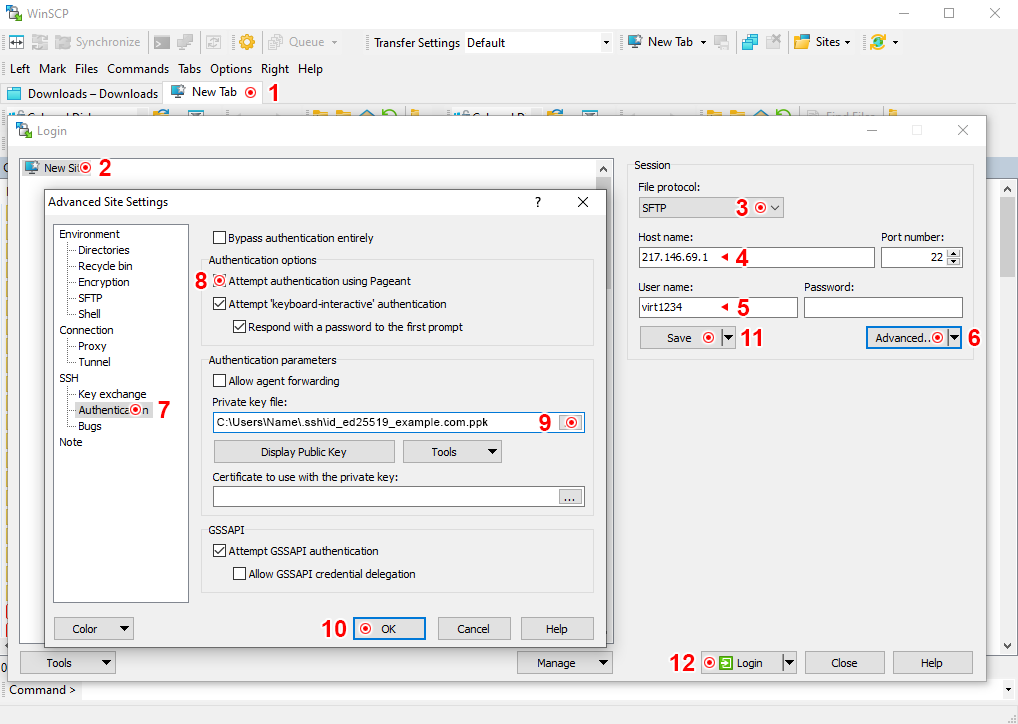
Open the Login dialog window by clicking on the tab New tab (1).
To add a new connection, click on New site (2).
Select SFTP from the File protocol drop-down menu (3).
Into the Host name textbox enter the IP address of the hosting server or the domain name of the web server hosted on that server (4). It is recommended to use the IP address to avoid possible DNS issues with the domain. The Port number is 22.
Enter the system username into the User name textbox (5). Leave the Password textbox empty because key pair authentication is used.
Open more settings by clicking the Advanced button (6).
In the opened dialog box, select from menu tree: SSH > Authentication (7).
WinSCP only supports private keys in Putty format (with the file extension .PPK).
If Pageant is used to load the private key, mark the Attempt authentication using Pageant selected (8).
Or specify the location of the private key file on the computer using the Private key file selection box (9).
Save the changes by clicking OK (10).
Save the site by clicking Save button (11), giving it a name.
Now you can establish an SFTP connection by selecting the site from the list on the left and clicking Login button (12).
Visual Studio Code
There are various SFTP extensions available for Visual Studio Code. In this guide, the following SFTP extension is used:
Visual Studio Marketplace – SFTP
Github.com – vscode-sftp
Open the Visual Studio Code extensions tab (1) and search for extensions using the keyword SFTP (2) and then install the extension which is highlighted on the image by clicking the Install button next to it (3).
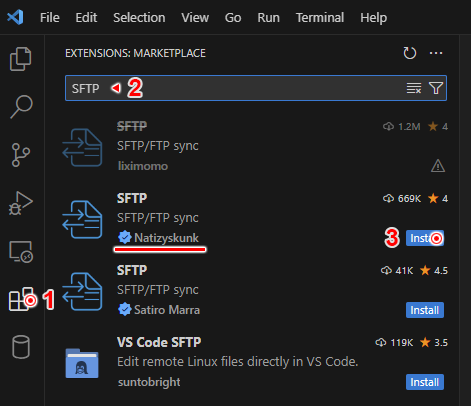
If another SFTP extension is installed, its configuration and functionality may differ, but the connection parameters are the same. Follow the extension’s documentation for setting up.
In the Visual Studio Code’s Explorer tab, open the folder or workspace where you want to synchronize files with the web server or where you want to download files from the web server – an SFTP configuration file named sftp.json will be created then into folder named .vscode.
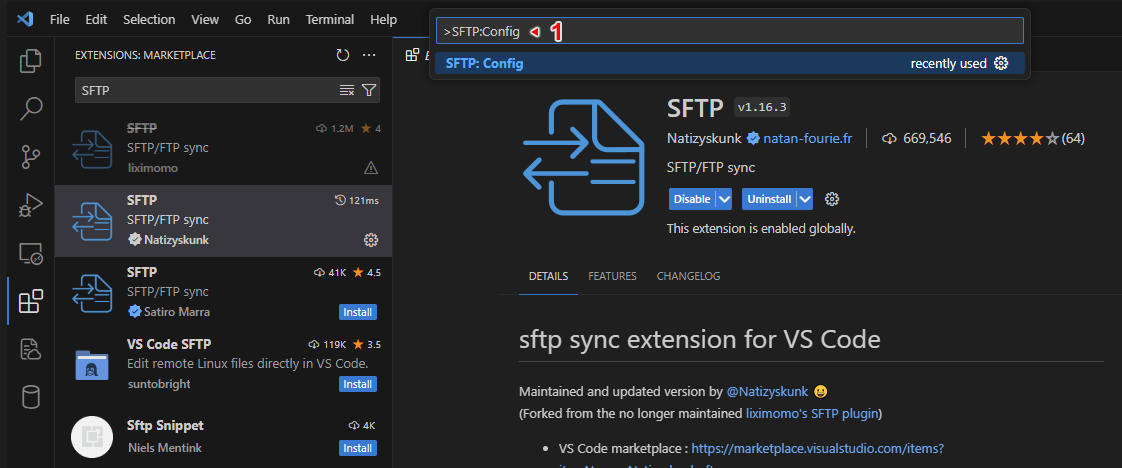
Open the command palette (with the key combination Ctrl + Shift + P) and type SFTP: Config (1) in the search box and press Enter, which will create the SFTP configuration file sftp.json and open it for configuration.
Three different configurations for the file sftp.json, depending on how the private key is loaded
sftp.json configuration for direct private key loading:
{
    "name": "example.com - SFTP",
    "host": "217.146.69.1",
    "protocol": "sftp",
    "port": 22,
    "username": "virt1234",
    "privateKeyPath": "~/.ssh/id_ed25519_example.com",
    "passphrase": true,
    "openSsh": false,
    "uploadOnSave": false
}
sftp.json configuration using SSH config file:
{
    "name": "example.com - SFTP",
    "host": "217.146.69.1",
    "protocol": "sftp",
    "port": 22,
    "username": "virt1234",
    "sshConfigPath": "~/.ssh/config",
    "uploadOnSave": false
}
sftp.json configuration when using an agent:
{
    "name": "example.com - SFTP",
    "host": "217.146.69.1",
    "protocol": "sftp",
    "port": 22,
    "username": "virt1234",
    "agent": "pageant",
    "remotePath": "/data01/virt1234/domeenid/www.example.com",
    "uploadOnSave": false
}