General
If you are hosting your website on Zone virtual server and you would like to send emails out from your website, please note, that ports 25, 1025, 1026, 465 and 587 are closed. Hence you can not use smtp.zone.eu server or any other server that is using the mentioned ports.
In order to send emails from your website, localhost has to be assigned as SMTP host name and port 25 should be used. Authentication or secure connection (SSL/TLS) is not required. Those values should be assigned as false or none.
Here’s an example of PHP script’s settings:
$mail->Mailer = "smtp";
$mail->Host = "localhost";
$mail->Port = "25";
$mail->SMTPSecure = 'none';
$mail->SMTPAutoTLS = false;
$mail->SMTPAuth = false;
The Laravel setup looks like this:
MAIL_MAILER=smtp
MAIL_HOST=localhost
MAIL_PORT=25
MAIL_USERNAME=
MAIL_PASSWORD=
MAIL_ENCRYPTION=null
Email limitations
You are allowed to send out one email every five seconds. If you exceed this limit, an automatic restriction will be applied on sending emails via webserver. To remove this restriction, please contact our customer support at info@zone.ee
SPF
When sending out emails from your webserver, please make sure that your domain’s SPF record allows it. Otherwise the emails will be marked as spam or won’t be delivered at all.
In case your domain is using only Zone email services, the SPF record should look like this:
v=spf1 a mx include:_spf.zone.eu -all
If your website is hosted with us, but you are using email services elsewhere, the SPF record should be modified accordingly. Adding include:_spf.zone.eu to your domain’s SPF record is sufficient. Here’s an example:
v=spf1 ip4:123.4.5.6 include:_spf.zone.eu -all
DKIM
In order to add authenticity to email that are sent from your webserver, you can use DKIM signature. DKIM will add a cryptographic signature to the email, so that the receiving end can be sure that the email was sent out properly and it has not been forged.
To activate DKIM, log in to “My Zone” and choose Web hosting->Email. Further guidelines can be found here.
.
Changing PHP sendmail_from
By default, the email form your web server are sent out from noreply address – for example noreply@example.com. This can be changed with PHP mail() function’s fifth parameter -f.
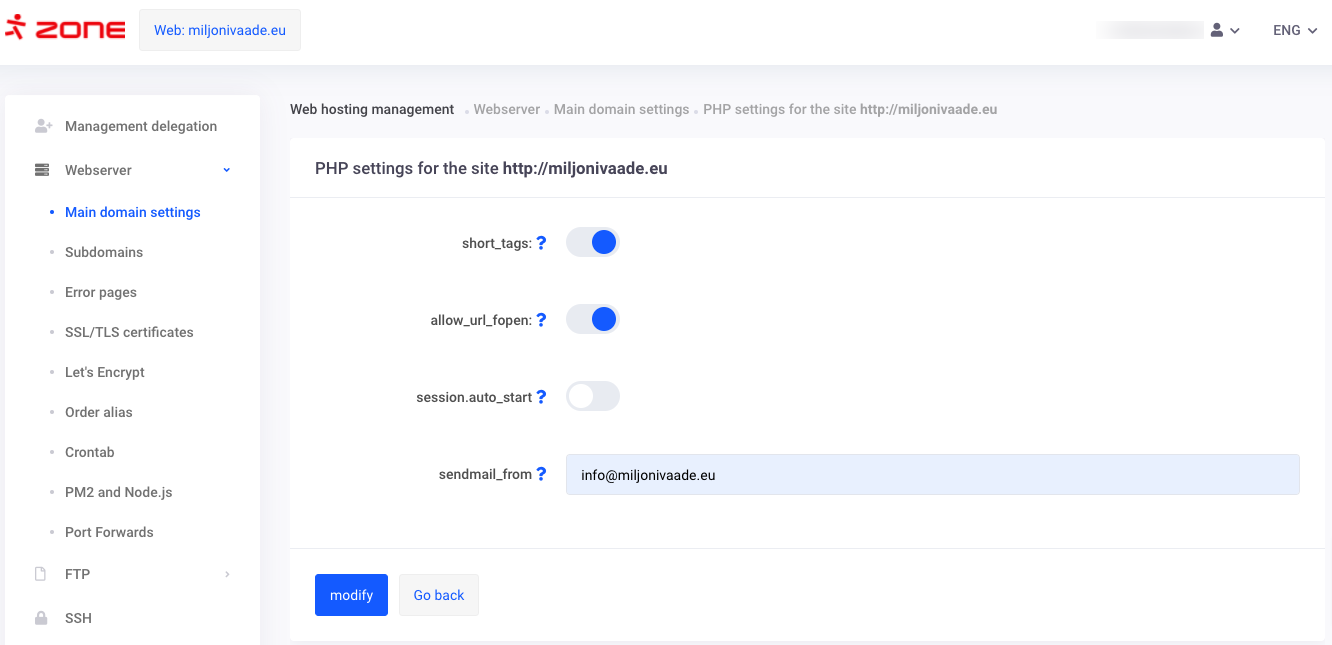
To change the default noreply address, log in to My Zone and choose Web hosting->Webserver->Main domain settings->Modify–>PHP settings.
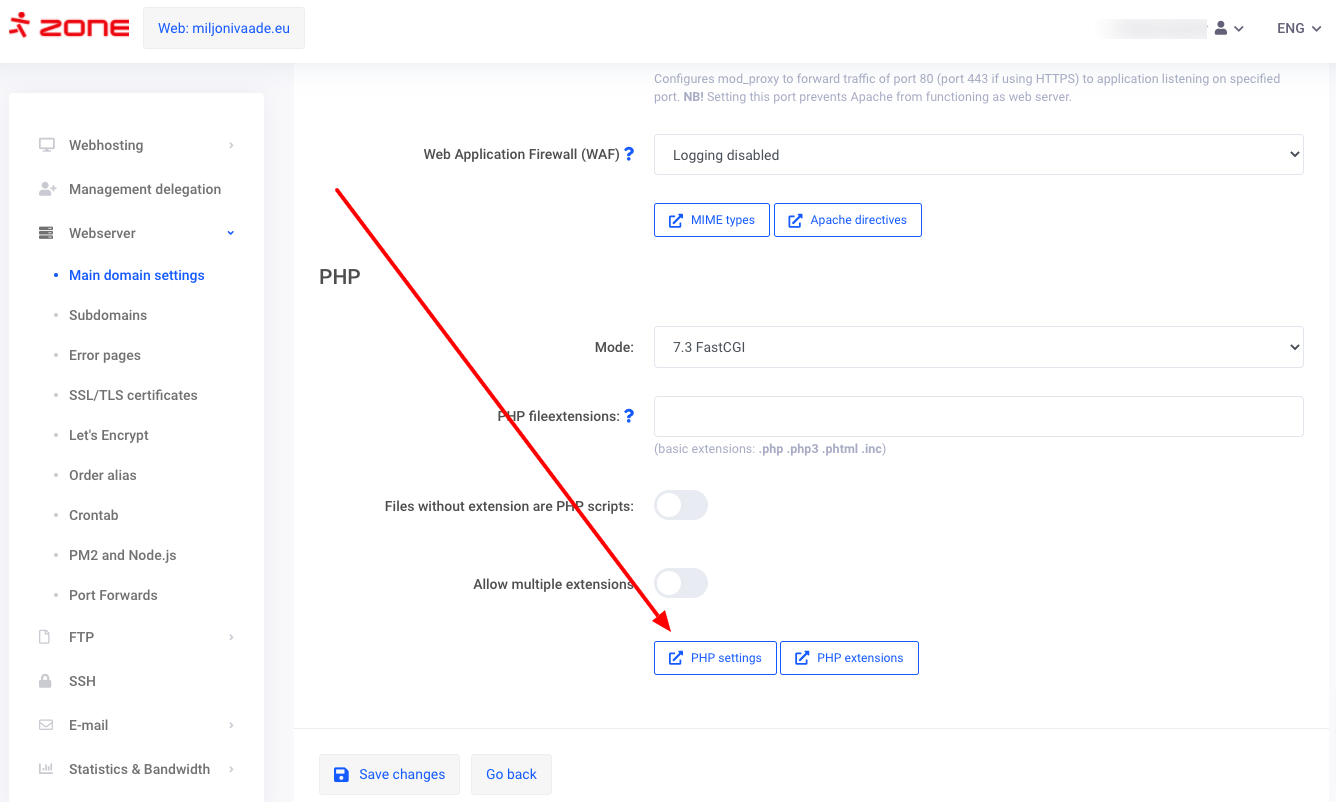
On the next page the sendmail_from value must be changed . You only need to enter the e-mail address in the form of address@example.com.
Log of e-mails sent from web server
The log of emails from the web server can be seen in the My Zone via Web-hosting management under Logs -> Webserver e-mail.
Detailed instructions on the logs can be found here.
Using an external SMTP server
Prerequisites for using an external SMTP server:
- Web-hosting package Pro
- Dedicated IP address (comes with web-hosting Pro package, ask customer support to activate it)
- external SMTP server that supports TLS/SSL connection over port 587
In order to send a mail from the web server through an external server, the application must send the mail to the IP address allocated to the virtual server. Typical plugins for WordPress and other applications do not allow you to do this in the user interface, so you have to do the configuration directly on a per-file basis.
It must be taken into account that the webserver e-mail log visible in the My Zone management panel does not display the mails sent via an external server.
Example 1: WP Mail SMTP by WPForms
To send emails from the specific IP address, the following filter must be added into the functions.php file:
add_filter('wp_mail_smtp_custom_options',function($phpmailer){
  $phpmailer->SMTPOptions=[
    'socket'=>[
      'bindto' => '1.2.3.4:0'
    ]
  ];
  return $phpmailer;
});
where on the row of 'bindto' => '1.2.3.4:0' replace '1.2.3.4:0' with a allocated dedicated IP address.
Example 2: Nodemailer
In Nodemailer, you can set up dedicated IP address with the localAddress value. Gmaili SMTP as an example:
nodemailer.createTransport({
    host: 'smtp.gmail.com',
    port: 465,
    secure: true,
    auth: {
        user: 'username@gmail.com',
        pass: 'password'
    },
    localAddress: '1.2.3.4'
});
where on the row of localAddress: '1.2.3.4' replace '1.2.3.4' with a allocated dedicated IP address.